Have you ever been cruising down the road and heard that unmistakable blast of a train horn? It’s loud, commanding, and impossible to ignore. What if you could bring that exhilarating sound right to your vehicle? Installing a Train Horn with Compressor isn’t just about volume; it expresses personality and power. Whether you’re looking to make an impression at car shows or want something unique for your daily drive, this guide will walk you through the entire DIY installation process step by step. Get ready to turn heads and shake up your ride with a stunning setup that delivers style and substance!
Loud Air and Train Horn Kits
Loud air and train horn kits are designed to deliver powerful sounds that can turn heads. These systems emulate the iconic blast of a real train horn, making them popular among truck enthusiasts and those who want to make a statement on the road.
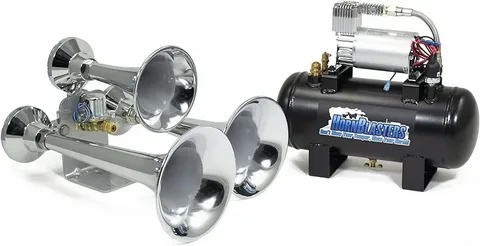
These kits typically include everything you need for installation—horns, compressors, an air tank, tubing, and wiring. This comprehensive setup ensures maximum volume and effectiveness with each honk.
With various options available in size and design, you can choose a kit that suits your vehicle’s aesthetic while delivering impressive auditory performance. Most setups also offer different types of horns; some replicate multiple tones found in actual trains.
Whether you’re looking to enhance safety or enjoy the thrill of having an attention-grabbing horn system, a loud air train horn kit is a fantastic addition. It’s fun and functional—a great conversation starter wherever you go!
Understanding Best Train Horn Kit Systems
Best Train Horn Kit systems combine power, sound, and engineering to create that unmistakable blast. These systems typically include a set of horns that produce various pitches when air flows through them. The result is an attention-grabbing noise designed to alert others in the vicinity.
The core components include the compressor, air tank, tubing, and horns. The compressor generates high-pressure air, which the tank stores until needed. This pressurized air travels through tubing connected to the horns for operation.
Different train horn kits offer varying levels of loudness and pitch combinations. Choosing a kit suitable for your needs is essential—consider factors like vehicle type and intended use.
Understanding how these parts work together enhances your installation experience. Each component is vital in producing that powerful sound synonymous with train horns.
Benefits of Installing a Train Horn
Installing a train horn on your vehicle enhances safety, adds unique character, and offers versatility and reliability through controlled air pressure regulation.
Enhanced Safety
Installing a train horn can dramatically enhance your vehicle’s auditory presence. The sound produced is loud and attention-grabbing, making it an effective tool for safety on the road. With its powerful blast, you can alert other drivers and pedestrians to your presence, especially in noisy environments.
Unique Character and Style
Another benefit is the unique character it adds to your vehicle. A train horn isn’t just about volume; it’s about style and individuality. Whether at car shows or cruising around town, having a distinctive horn sets your ride apart.
Versatility
Train horns are versatile, too. They’re suitable for trucks, SUVs, or even smaller cars if you want to make a statement. They come in various styles and sizes to fit different preferences and needs.
Tools and Materials Needed
Before diving into your train horn installation, gather all the necessary tools and materials. This will streamline the process and ensure everything goes smoothly.
You’ll need a quality air compressor designed explicitly for train horns. Make sure it has enough power to deliver the loud sound you desire. An appropriate air tank is also essential for storing compressed air effectively.
Remember about tubing! High-pressure tubing is required to connect various system components. A suitable diameter ensures efficient airflow without restrictions, which helps achieve that iconic blast.
Have wiring supplies on hand, including connectors, fuses, and switches. Tools like wrenches, screwdrivers, and a multimeter are vital for installation and troubleshooting electrical issues. Being prepared can make all the difference in achieving optimal results with your new setup.
Safety Precautions
Safety should always come first when working with a train horn system. Wear protective gear such as gloves and goggles. The loud sounds emitted can be startling, so protect your ears.
Be mindful of the pressure in the air tank. Over-pressurization can lead to dangerous situations or equipment failure. Always check for leaks and ensure connections are secure before applying power to the compressor.
Keep your workspace organized and free from clutter. This reduces the risk of accidents while handling tools and components. A tidy space lets you focus on adequately installing that train horn.
Familiarize yourself with all electrical components involved in the installation process. Use insulated tools when working with wiring to prevent electric shock. Understanding how each part operates is key to ensuring a smooth setup without mishaps.
Installing the Best Train Horns
Installing the Best Train Horns is crucial in your train horn system setup. Choose a suitable location for the compressor, ideally under the hood or inside your vehicle’s trunk. Ensure it’s easily accessible for maintenance but secure enough to withstand vibrations.
Start by securing the compressor with brackets or bolts provided in your kit. Ensure it’s mounted firmly to minimize noise and movement while driving. It should be positioned away from heat sources, as excessive temperatures can damage internal components.
Next, connect all necessary hoses and electrical wires according to your manufacturer’s instructions. Pay attention to correct routing; avoid sharp bends that could restrict airflow or cause leaks over time.
Double-check all connections for tightness and integrity before powering up the unit. This ensures proper functionality when you activate your train horn system later on, providing that loud blast of sound you’re aiming for!
Setting Up the Air Horn For Trucks
Once you’ve installed the air compressor, it’s time to set up the Air Horn For Trucks. This component stores compressed air and is essential for your train horn system with a compressor. Please choose a location that provides easy access and ventilation, often near the compressor.
Secure the tank using appropriate mounting brackets. Ensure it is level to avoid any issues during operation. Ensure there are no obstructions around it; this allows for better airflow and maintenance access.
Next, connect the tank to your compressor using high-pressure tubing or piping. Check for compatibility in terms of size and pressure ratings. Tighten all fittings properly to prevent leaks.
After making connections, fill the tank slowly while monitoring pressure levels on your gauge. It’s crucial not to overfill, as excess pressure can lead to safety hazards or equipment damage later.
Connecting the Tubing
Connecting the tubing is crucial in setting up your train horn system. This process ensures air flows smoothly from the compressor to the horns, maximizing their performance.
Start by measuring and cutting the tubing to the required lengths. Be sure to leave some extra length for adjustments later on. Quality matters here; durable, high-pressure tubing will prevent leaks and ensure longevity.
Next, attach one end of the tubing to the output port of your air tank or compressor. Secure it tightly using hose clamps or appropriate fittings to avoid any disconnections during operation.
Now, connect the other end of each tube to its respective train horn. Make sure all connections are snug and leak-free. A well-executed connection guarantees that your horn with compressor operates efficiently when it’s time to make some noise!
Wiring the Truck Air Horn Kit
Wiring your Truck Air Horn Kit with a compressor is a crucial step that ensures everything functions correctly. Start by identifying the positive and negative terminals on the compressor and the horns. It’s vital to keep these connections clear to avoid any electrical mishaps.
Use quality wiring that can handle the necessary voltage and current. Often, 14-gauge wire works well for this type of setup. Strip each end of the wires using a wire stripper, taking care not to damage them.
Next, connect one end of each wire to its respective terminal on the air compressor. For durability, secure these connections tightly with solder or heat shrink connectors.
Once you’ve wired the compressor, you can connect it to your train horns with similar methods. Proper wiring will ensure optimal performance when you sound those powerful blasts!
Conclusion
Installing a Train Horn With Compressor can elevate your vehicle’s sound profile. The unmistakable blast of air horns enhances the fun factor and serves practical purposes on the road. Proper installation will give your new setup both power and reliability. It’s essential to follow each step carefully for optimal performance and safety.
FAQs
What type of compressor do I need for a train horn?
The size and power of the compressor depend on the specific model of your train horn kit. You’ll typically want one that can deliver enough air pressure—usually around 100-150 PSI—and is ideal for loud performance.
Can I install a train Train Horn with Compressor myself?
Yes! Many DIY enthusiasts successfully install these Train Horn With Compressor at home. However, it is essential to follow instructions carefully and ensure all components are compatible.
Do I need special permits to install a train horn?
Regulations vary by location. Before installation, it’s wise to check local laws regarding sound ordinances to avoid fines or issues with authorities.
How loud is a typical train horn system?
Train horns can reach decibel levels exceeding 130 dB, making them extremely loud and effective for alerting others on the road or at rail crossings.
| Related Business Listings |
| Contact Directory |
| Local Business Profiles |