Your Suzuki Swift is more than just a car; it’s your trusty companion on daily commutes and spontaneous road trips. However, like all vehicles, it needs regular upkeep to perform at its best. One critical component that often gets overlooked is the Suzuki Swift Alternator. This unsung hero charges your battery and powers essential electrical systems while you’re on the go. Whether you’re a seasoned DIYer or someone who’s never lifted a hood, this guide will provide insight into maintaining that vital component of your vehicle’s electrical system.
How to Identify a Failing Suzuki Swift Alternator Replacement?
A failing alternator can turn your Suzuki Swift from a reliable ride into a roadside drama. Catching the signs early is essential so you don’t end up stranded with a dead battery. One of the first indicators is dimming headlights. If your lights flicker or brighten unexpectedly, it’s time to investigate further. Listen closely when you start your car. Strange noises like grinding or whining could signal that your alternator bearings are wearing out. These sounds aren’t just annoying; they tell you something is amiss under the hood. Ignoring them might lead to complete failure down the line.
Another red flag is if you’re experiencing electrical issues in other systems, such as power windows or radio malfunctions. When these components show erratic behaviour, it may indicate that your Suzuki Swift Alternator Replacement isn’t supplying enough power. You should also pay attention to warning lights on your dashboard. A battery light glowing ominously could be trying to tell you exactly what’s wrong—your alternator might be struggling to keep up with demand.
If you’ve had recent battery replacements and find yourself jumping back into troubleshooting mode soon after, don’t overlook the possibility of an underlying alternator problem lurking beneath the surface of that shiny new battery!
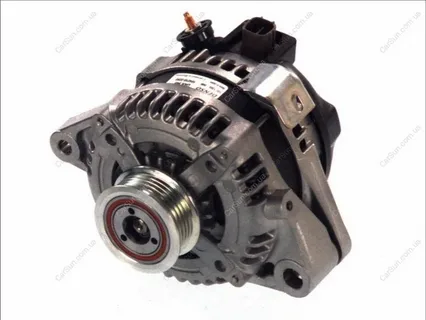
Replacing the Alternator on the Swift Suzuki
Replacing the alternator in your Suzuki Swift is a task that might seem daunting, but with a bit of guidance, you can tackle it like a pro. First, gather your tools—wrenches, sockets, and maybe even some elbow grease will come in handy. Before diving into the project, you’ll want to ensure everything is within reach. Start by disconnecting the battery. This step is crucial for safety; working with electrical components while powered up can lead to surprises. Once that’s done, locate the alternator under the hood—it’s usually situated near the front of the engine bay.
Next, remove any belts connected to it. Note how they’re arranged; snapping a quick photo could save you time during reassembly. With belts out of the way, unscrew any bolts holding the alternator in place and gently wiggle it free from its mount. Installing your new Alternator Swift Suzuki is where all your prep pays off! Align it carefully and secure it with bolts per the manufacturer’s specifications. Don’t forget those belts; ensure they’re fitted snugly back onto their pulleys.
Once everything’s assembled correctly, reconnect your battery. Turn on your ignition, watch for warning lights, and let that new alternator work its magic!
Alternator Swift Problems: Symptoms and Solutions
Regarding your Suzuki Swift, the alternator plays a vital role in keeping things running smoothly. A failing alternator can lead to several issues that may leave you stranded or cause electrical problems. Being aware of the symptoms can save you time and money. One common sign is dimming headlights, especially when idling at traffic lights. If those beams flicker like a disco ball, your alternator may struggle to meet power demands. Please don’t ignore this warning; it could be the first hint of an impending failure.
Another red flag is unusual sounds coming from under the hood. A grinding noise often indicates worn bearings within the alternator itself. The sound might start as subtle but can escalate quickly if left unchecked. You might also notice that your battery isn’t holding a charge as well as it used to. Frequent jump-starts are not just annoying—they’re signs that your Suzuki alternator isn’t delivering enough power for optimal battery performance.
Look out for dashboard warning lights illuminating unexpectedly, remarkably, the battery light. This signal begs immediate attention and could directly point to your Alternator Swift needing some TLC or replacement! Keep these signs in mind and address them promptly for smoother driving ahead.
Choosing the Right Replacement Suzuki Alternator
Choosing the right Replacement Suzuki alternator can feel like a daunting task. With so many options available, you want to ensure that you select one that not only fits perfectly but also runs efficiently. Quality should be your top priority. Opt for OEM (Original Equipment Manufacturer) parts whenever possible. They are designed specifically for your vehicle and guarantee optimal performance. Consider the warranty offered on the replacement alternator. A robust warranty reflects a manufacturer’s confidence in their product’s durability and reliability. It’s an assurance that you’re investing in something built to last.
Pay attention to compatibility also; not all models share the exact specifications. Research or consult with professionals about which alternators align best with your specific year and model of Suzuki Swift. Price is another factor, but don’t let it be the sole deciding element in your choice. Cheaper isn’t always better, especially if it compromises quality or longevity.
Look for user reviews online or ask fellow Suzuki enthusiasts about their experiences with various brands and models. Their insights could help you make a well-informed decision tailored to your needs.
Battery Warning Light On? It Could Be the Suzuki Alternator
Seeing that battery warning light flicker on your dashboard can be alarming. It’s like a cry for help from your Suzuki Swift, often pointing to an underlying issue with the alternator. This little component is crucial in keeping things running smoothly, powering everything from your lights to the radio. When the alternator starts to fail, it struggles to charge the battery effectively. As a result, you may notice dimming headlights or electrical fluctuations while driving. If that pesky warning light appears alongside these symptoms, don’t ignore it!
The key role of the alternator is to convert mechanical energy into electrical energy. When it’s on its last legs, not only does your vehicle’s performance suffer, but so does your comfort during those daily drives. Keeping tabs on this part can save you time and money. A quick check can make all the difference here. You might want to inspect connections and wiring first; sometimes, loose cables are all needed for proper functionality again! However, if issues persist after checking these simple fixes, consider visiting a professional mechanic.
That small battery symbol could help you better understand how vital an efficient Suzuki alternator is for reliable performance!
Troubleshooting Charging Issues in the Suzuki Swift
If you’re experiencing charging issues with your Suzuki Swift, don’t panic. The first step in troubleshooting is to check the battery connections. Loose or corroded terminals can prevent proper power flow. Ensure everything is snug and clean—this simple fix might save you a trip to the mechanic. Next, take a look at your alternator belt. It may not turn the alternator effectively if worn out or loose, leading to insufficient battery charging. A quick inspection can determine if this component needs attention before things worsen.
Another vital aspect to consider is the voltage regulator within your alternator system. If it malfunctions, it could lead to overcharging or undercharging your battery. Use a multimeter for testing; this handy tool can help reveal whether you’re getting adequate voltage output from your alternator. Don’t forget about fuses! A blown fuse related to the charging system could halt function entirely without any visible signs on other components. Check those little guys too—they might be tiny, but they play an equally crucial role in keeping things running smoothly.
Listen closely for unusual noises while driving. Grinding or whining sounds often indicate that something isn’t quite right with your alternator’s internals and needs further investigation.
A Quick Guide to Maintaining Your Suzuki Alternator
Keeping your Suzuki alternator in peak condition is essential for a smooth ride. Regular maintenance can save you from unexpected breakdowns and costly repairs. It all starts with a visual inspection of your alternator and its connections. Check for any signs of wear or corrosion on the wiring and terminals. A clean connection ensures efficient power transfer, preventing issues before they start. If you notice any fraying wires or rust, it’s time to address those concerns promptly.
Next, listen to your engine while it’s running. An unusual whining sound may indicate trouble inside that little powerhouse. Please pay attention to changes; they’re often an early warning sign that something’s amiss. Don’t forget about keeping your battery healthy! A well-charged battery supports the alternator by providing consistent voltage levels, so ensure it’s also regularly serviced. Schedule periodic checks for both components at reliable service centres.
Always refer to your owner’s manual for specific maintenance schedules tailored to your Suzuki Swift model. Following these guidelines helps prolong the life of your alternator while ensuring optimal performance on every journey.
When and Why to Replace the Swift Car Alternator
Your Swift Car Alternator is crucial in keeping your vehicle running smoothly. It charges the battery and powers the electrical system while you’re on the move. When it falters, you may find yourself grappling with various issues. The first sign that it’s time for an alternator replacement often comes from your dashboard. If you notice warning lights flickering—especially the battery light—it’s a signal to pay attention. Ignoring this can lead to more significant problems down the road.
Another red flag is dimming headlights or interior lights. Your alternator might not supply enough power if it seems weaker than usual. This could result in a less-than-stellar driving experience, especially at night. Strange noises are also worth noting. A failing alternator can produce grinding or whining sounds as its bearings wear out over time. These auditory alerts shouldn’t be overlooked; they indicate that something isn’t right under the hood.
If you frequently jump-start your car or have trouble starting it altogether, it’s likely a sign of an aging alternator losing its ability to keep up with demand. Addressing these symptoms promptly ensures you’re not stranded when least expected!
Conclusion?
Upgrading your Suzuki Swift alternator can feel daunting, but it doesn’t have to be. Armed with the correct information and tools, you can tackle this project with confidence and ease. Understanding the signs of a failing alternator empowers you to act promptly before issues escalate. The heart of your vehicle’s electrical system relies heavily on the alternator. Recognising its importance is essential for maintaining optimal performance. With simple troubleshooting tips at hand, you’re equipped to diagnose common problems effectively. Choosing the appropriate replacement part for your Suzuki Swift ensures longevity and reliability.
FAQS
What are the common symptoms of a failing alternator in a Suzuki Swift?
Common symptoms include dimming lights, unusual noises when starting the engine, dashboard warning lights illuminating (especially the battery light), and difficulty starting the vehicle.
How long does an average Suzuki Swift alternator last?
A Suzuki Swift alternator typically lasts between 80,000 and 150,000 miles, depending on driving conditions and maintenance practices.
Can I drive my Suzuki Swift with a faulty alternator?
It’s best not to drive with a faulty alternator, as it could cause a complete loss of electrical power.
What tools do I need to replace my Suzuki alternator?
Basic tools required may include wrenches or sockets (usually metric), screwdrivers, pliers, and belt tensioning tools for belt replacement.
Should I buy OEM or aftermarket parts for my new alternator?
OEM parts typically offer better compatibility and warranty options; however, high-quality aftermarket alternatives can be more cost-effective without sacrificing reliability.