A wood fence is extra than only a boundary; it’s a statement of favor, privateness, and protection for your private home. Whether you’re aiming to preserve pets in, preserve intruders out, or really upload shrink enchantment, a wooden fences set up is a undying option. Many house owners choose this type of fencing because it’s notably clean to put in, long lasting, and blends beautifully with natural environment.
In this guide, we’ll stroll you via the step-by way of-step wood fences installation process. Whether you’re a DIY enthusiast or planning to lease an low priced fence organization, knowledge the process helps make sure a successful outcome.
Why Choose a Wood Fence?
Before diving into the installation, it’s really worth noting why wooden fencing remains a pinnacle preference:
Aesthetic Appeal: Wood has a heat, herbal look that enhances virtually any landscape layout.
Customizability: It can be painted, stained, or fashioned to suit your style.
Functionality: Great for privateness, safety, and marking assets lines.
Affordability: Compared to steel or vinyl alternatives, wood fencing is often extra budget-friendly.
Let’s get into the nuts and bolts of the way to get that fence up.
Step 1: Plan and Prepare
Every a hit assignment begins with a stable plan. First, decide wherein your fence will move and what its number one characteristic is—privateness, ornament, protection, or containment. This will impact the height and style of the fence.
Things to Do:
Check Property Lines: Avoid disputes with the aid of consulting your own home survey.
Obtain Permits: Some municipalities require fencing permits. Check nearby zoning laws.
Call Before You Dig: Contact application groups to mark underground strains.
Measure Carefully: Calculate how many panels, posts, and pickets you need.
Step 2: Gather Tools and Materials
If you’re doing the timber fences set up yourself, you’ll need quite a number equipment and components.
Materials:
Wooden fence posts
Fence panels or person pickets
Concrete blend
Gravel
Nails or screws
Wood preservative or sealant
Tools:
Post hollow digger or auger
Hammer or nail gun
Tape measure
Level
String line
Saw
Wheelbarrow and shovel
If you are uncertain about gear or enjoy, hiring an less expensive fence organisation might be the exceptional direction. They’ll already have everything required and may complete the job successfully.
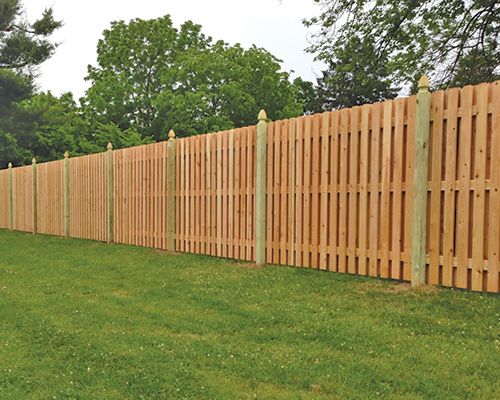
Step 3: Install Fence Posts
Fence posts are the backbone of your fence. Getting this step right guarantees the shape is sturdy and lengthy-lasting.
Instructions:
Mark Post Locations: Use a string line to keep the entirety straight.
Dig Holes: Holes ought to be one-1/3 the height of the publish (generally 2–3 feet deep).
Add Gravel: Pour 4–6 inches of gravel at the lowest for drainage.
Set the Posts: Place posts in the holes, ensuring they’re stage.
Add Concrete: Pour concrete into the hollow and permit 24–48 hours to set.
Tip: Use braces to keep posts upright at the same time as the concrete treatments.
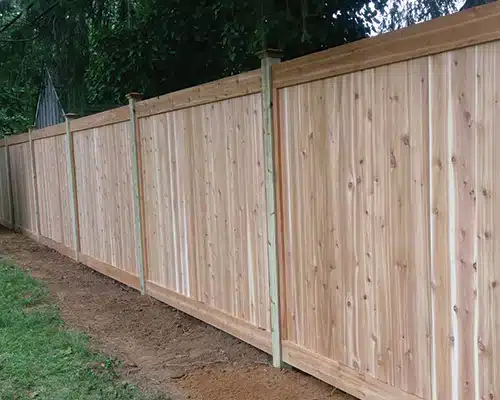
Step 4: Attach Rails or Panels
Once the posts are set, it’s time to add horizontal rails (if the use of pickets) or full panels.
For Rails:
Attach or three rails horizontally between posts the use of nails or screws.
Ensure they’re stage and flippantly spaced.
For Panels:
Position every panel among posts and stable with brackets or screws.
Use a level to maintain consistency alongside the fence line.
This is wherein precision matters. Uneven rails or slanted panels can break the look and compromise the structure.
Step 5: Install Pickets (If Not Using Panels)
If you are going with character pickets instead of preassembled panels, this step requires a bit more time.
Instructions:
Mark the First Picket: Ensure it’s plumb (vertically level) and at the appropriate peak.
Space Evenly: Use a spacer block (commonly 2-3 inches) between pickets.
Nail or Screw in Place: Secure each picket to the rails with fasteners in keeping with rail.
While this method takes greater effort, it gives greater customization and flexibility in design.
Step 6: Add Gates (If Needed)
If your fence design includes a gate, now’s the time to install it. Use sturdy hinges and a durable latch gadget. Make sure it opens smoothly and aligns with the relaxation of the fence.
Tip: Reinforce gate posts with extra concrete and bracing—they endure extra pressure over time.
Step 7: Finishing Touches
To expand the life of your wooden fence and enhance its appearance, observe a timber preservative, paint, or stain.
Why Finish?
Weather Protection: Sealing wooden helps resist moisture, rot, and pests.
Aesthetic Appeal: Choose a stain or colour that enhances your own home.
Durability: Finishing prevents the wooden from warping or cracking.
Be sure to reapply sealant each 2–3 years, depending in your neighborhood climate.
Maintenance Tips for a Long-Lasting Fence
Even the quality-built timber fence requires normal upkeep. Here are a few recommendations:
Inspect Annually: Look for free nails, broken pickets, or leaning posts.
Clean Periodically: Use a slight detergent and a strain washer on low settings.
Trim Vegetation: Keep timber and vines from growing on or close to the fence.
If upkeep are beyond your ability level, don’t forget contacting an lower priced fence business enterprise for quick, cost-effective service.
Final Thoughts
A nicely-accomplished wood fences set up no longer handiest beautifies your backyard but also provides fee and characteristic to your own home. Whether you’re doing it your self or working with an affordable fence company, understanding the steps allows you are making informed selections and avoid not unusual pitfalls.
While the method calls for making plans and attempt, the end result—a stable, appealing outdoor space—is well worth every bit. From marking posts to sealing the final wooden, each step performs a important position in building a fence so as to stand strong for years.