If you own a 2005 Mazda 3, you’re likely familiar with the joys of driving this compact car. However, like any vehicle, maintenance and occasional repairs are required to keep it running smoothly. One often overlooked component is the fuel pump lock ring. This small but crucial part secures your fuel pump and ensures proper function. It can lead to serious issues when it becomes damaged or worn out.
But don’t worry! Replacing the fuel pump lock ring isn’t as daunting as it sounds. You can tackle this task with some basic tools and guidance and save on mechanic fees. Ready to get started? Let’s dive into everything you need to know about replacing the 2005 Mazda 3 fuel pump lock ring!
Understanding The Fuel Pump Lock Ring
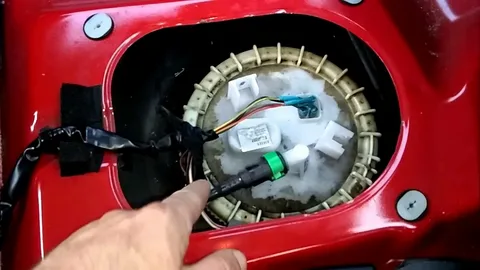
The fuel pump lock ring is vital to your 2005 Mazda 3’s fuel system. It holds the fuel pump assembly securely in place within the gas tank, ensuring that the pump can deliver fuel to the engine without interruption.
This small metal ring is made of durable materials and is designed to withstand high pressure and various temperature fluctuations. Despite its strength, it can become warped or damaged over time due to wear and tear or exposure to corrosive fuels.
A properly functioning lock ring helps maintain an airtight seal around the fuel system. If it becomes loose or compromised, you might notice leaks or decreased performance from your vehicle’s engine. Such issues affect efficiency and could lead to more serious problems.
Understanding how this part works can save you headaches later on. When replacing a failing lock ring, you’re not just fixing one issue; you’re ensuring that other components remain protected as well.
In essence, keeping an eye on your fuel pump lock ring will help prolong the life of your 2005 Mazda 3 while maintaining optimal performance levels during every drive you take.
Signs That The Lock Ring Needs Replacement
The fuel pump lock ring is a crucial component that can wear out over time. One of the most common signs indicating it needs replacement is fuel leakage. If you notice any gasoline pooling under your car, it’s essential to investigate further.
Another red flag is an unusual noise coming from the fuel tank area. A failing lock ring may cause rattling or clunking sounds as the pump becomes loose. This noise should not be ignored, as it can lead to more significant issues.
You might also experience fluctuating engine performance. Difficulty starting your Mazda 3 or stalling during acceleration often points to problems with the fuel delivery system, which could stem from a faulty lock ring.
A dashboard warning light can also indicate issues related to the fuel system. Pay attention if you see alerts for low fuel pressure; this could signify that the lock ring isn’t securing properly, affecting overall function.
If you’ve had repairs done recently and noticed any disconnections around the locking mechanism, it’s wise to check on them again. Loose connections can compromise safety and efficiency in fueling your vehicle effectively.
Tools And Materials Required For The Replacement
Having the right tools and materials is crucial when replacing the fuel pump lock ring in your 2005 Mazda 3. This ensures a smooth process and minimizes any potential roadblocks.
Start with safety gear. Gloves will protect your hands from fuel residue and sharp edges, and safety goggles are a smart choice to keep debris out of your eyes during the job.
Next, gather essential tools. You’ll need a socket set for removing bolts, pliers for handling stubborn components, and perhaps even a hammer to coax parts apart, if necessary, gently. A fuel line disconnect tool can also be particularly useful.
Remember about replacement parts. The new fuel pump lock ring should match your vehicle’s specifications precisely. Before purchasing, consult with an auto parts store or online retailer specializing in Mazda components.
During this process, stock up on some cleaning supplies like rags or shop towels for spills. Organizing everything will make it easier to focus on completing your repair without unnecessary interruptions.
Step-By-Step Instructions for Removing the Old 2004 Mazda 3 fuel pump lock ring
Before removing the old 2004 Mazda 3 fuel pump lock ring, ensure your vehicle is parked on a level surface. Engage the parking brake to prevent any unwanted movement. It’s crucial to work safely and avoid potential accidents.
Begin by disconnecting the battery negative terminal. This step will help eliminate any electrical hazards while working near fuel components. Next, relieve the fuel system pressure to prevent any gasoline from spraying when you remove the lock ring.
Next, locate the access panel or fuel tank cover under your Mazda 3’s rear seat or trunk area. Remove any screws or clips holding it in place using a screwdriver or pliers. Once exposed, inspect for dust and debris around the locking mechanism before proceeding.
Use a suitable tool, such as a fuel pump lock ring removal tool, if available. Carefully insert it into position and turn counterclockwise to loosen the old lock ring. If it feels stuck, apply penetrating oil sparingly to ease its removal without damaging surrounding parts.
After loosening, lift off the old lock ring with caution; use gloves since residual fuel may present. Inspect both the removed part and surrounding areas for signs of wear or damage before moving forward with installation preparations.
Preparing Your Vehicle For The Replacement
Before replacing your 2005 Mazda 3 fuel pump lock ring, it’s essential to prepare your vehicle properly. Start by ensuring you’re in a well-ventilated area. Working with fuel can produce harmful fumes, so open garage doors or windows for safety.
Next, disconnect the battery. This step is crucial as it prevents electrical sparks while working on the fuel system. Use a socket wrench to remove the negative terminal from the battery and secure it away from contact with other components.
Once that’s done, relieve pressure from the fuel system. You can do this by removing the fuse for the fuel pump and starting your engine until it stalls out due to lack of fuel. Doing so minimizes spills when you access the tank.
Now, it’s time to gather all the necessary tools nearby, including wrenches, screwdrivers, and safety goggles. Organizing everything will save time and reduce frustration during installation.
Wear gloves for added protection against sharp edges or remnants of old seals inside your tank. Taking these precautions ensures you work safely and effectively as you replace that lock ring.
Installing The New Fuel Pump Lock Ring
Once you’ve successfully removed the old fuel pump lock ring, it’s time to install the new one. Start by carefully positioning the new lock ring over the fuel pump assembly. Ensure that it aligns correctly with any notches or grooves on both components. This alignment is crucial for a secure fit and will help prevent leaks.
With the lock ring in place, use your hands to press it down gently until you feel resistance. It should sit snugly against the housing of your fuel tank. If you encounter any issues while seating it, double-check that no obstructions or debris prevent proper placement.
Next, grab your tool of choice—typically a specialty tool designed for locking rings—to securely tighten the new lock ring. Rotate it clockwise until it’s firmly in position, but avoid overtightening, as this can damage the ring and surrounding components.
After securing it in place, take a moment to inspect your work visually; look for any gaps or misalignments that could indicate improper installation. Attention to detail at this stage ensures longevity and reliability in operation.
Reconnect any electrical connectors associated with the fuel pump before reassembling other parts of your vehicle affected during disassembly. A meticulous approach here pays off significantly when you start your car again.
Common Mistakes To Avoid During Replacement
Replacing the fuel pump lock ring on your 2005 Mazda 3 is straightforward, but mistakes can lead to issues. One common error is not relieving the fuel pressure before starting. Skipping this step can result in fuel spraying everywhere, creating a hazardous situation.
Another frequent mistake is using incorrect tools. Using makeshift tools may damage components and prolong the replacement process. Invest in specialized tools designed for automotive work to ensure everything goes smoothly.
Many DIYers forget to clean around the locking area before removing the old lock ring. Dirt and debris can contaminate your new components or create leaks when you install them later.
Failing to torque the new lock ring properly is also an issue. Over-tightening can warp it or cause unnecessary stress while under-tightening might lead to leaks. Always follow manufacturer specifications for torque settings.
Neglecting to check for any signs of wear on surrounding parts, such as O-rings, should also be avoided. A worn O-ring could compromise your installation and lead you back into repair mode sooner than expected.
Testing Your Mazda 3 Fuel Pump Lock Ring After Installation
Once you’ve installed the new Mazda 3 Fuel Pump Lock Ring, it’s time to test the fuel pump. This step is crucial to ensure proper functionality and avoid any surprises down the road.
Start by reconnecting the battery. Before powering on your vehicle, make sure all electrical connections are secure. Check for any visible damage or loose wires that could lead to issues during testing.
Next, turn the ignition key to the “On” position without starting the engine. This allows the fuel pump to prime and pressurize the system. As it engages, you should hear a soft humming noise from beneath your car’s rear seat or trunk area.
After priming, check for leaks around where you’ve replaced the lock ring. Any signs of gasoline dripping or pooling indicate an improper seal that needs addressing immediately.
Start your Mazda 3 Fuel Pump Lock Ring and let it idle for a few minutes while observing its performance. Listen for unusual noises and watch for warning lights on your dashboard. You’ve successfully tested your installation to see if everything sounds normal and runs smoothly without leaks!
Conclusion
Replacing the fuel pump lock ring in your 2005 Mazda 3 may seem daunting, but it can be a manageable task with the right tools and knowledge. Understanding how this component works is key to ensuring your vehicle runs smoothly.
Taking the time to recognize signs of wear or damage will prevent bigger issues down the road. Addressing these problems early on helps maintain not just performance but also safety.
The step-by-step guide provided clarifies each phase of replacement. Every detail contributes to a successful outcome, from gathering materials to specific installation techniques.
Avoiding common pitfalls during this process is crucial for your project’s success. Careful attention ensures that no mistakes lead to further complications later on.
After completing the installation, testing your new lock ring and fuel pump guarantees everything operates as intended. This final check solidifies peace of mind, knowing you’ve successfully handled an essential aspect of vehicle maintenance.
FAQs
What is a fuel pump lock ring?
The fuel pump lock ring is a crucial component that secures the fuel pump assembly within the gas tank. It ensures a tight seal and prevents leaks, maintaining pressure in the fuel system.
How do I know if my lock ring needs replacing?
Signs include visible damage or corrosion on the ring, persistent gasoline odors around your vehicle, or issues starting due to inadequate fuel delivery.
Can I replace the lock ring myself?
Yes! With proper tools and patience, many DIY enthusiasts can handle this task. Just be sure to follow instructions carefully for safety and effectiveness.
What tools will I need for this replacement?
Basic hand tools like wrenches and pliers are essential. You may also need specialized tools, such as a locking-ring tool, for easier removal and installation.